Getting started
Thank you for choosing our theme.
We hope you are enjoying the quality and the convenience of our theme!
Preparation
Before you proceed to setting up your PrestaShop eCommerce, please make sure you are fully prepared. Please check the following points:
Server requirements
Please make sure your hosting server meets the PrestaShop requirements:
- System: Unix, Linux or Windows. Unix is highly recommended.
- Web server: Apache Web server 2.2 or any later version, Microsoft's IIS Web server 6.0 or later, and nginx 1.0 or later.
- We recommend PHP 7.1 or later.
- MySQL 5.6 or later recommended.
- At least 128 Mb of RAM on your server (64 Mb is comfortable, the more the better).
PrestaShop will work with PHP 5.6 or later, but the versions lower than 7.4 have bugs which might prevent some functions from working as expected.
In order to run PrestaShop 1.7.x properly, your PHP installation must feature the following settings:
- magic_quotes_gpc = off
- memory_limit = 512M
- max_execution_time = 300
- max_input_time = 300
- upload_max_filesize = 100M
- post_max_size = 20M
- max_input_vars = 10000
- allow_url_fopen = on
- safe_mode = off
Using the local server
You can run PrestaShop locally on your computer using the local server. To create a local hosting server, please use the localhost applications, such as WAMP, AppServer, XAMPP etc. Any of those can be easily installed as any other program and used to run PrestaShop.
Downloading
To install PrestaShop, you need to download the PrestaShop engine package from the official website at www.prestashop.com/en/downloads Just insert your name and e-mail into the Download box input and click the 'Download' button.
Please make sure your version of PrestaShop engine matches the template requirements.
Extracting Files
Once the PrestaShop engine package is downloaded, you will need to extract its files and folders from the archive.
This can be done with any archive manager like WinZip (Windows), StuffitExpander (Mac), etc.
Please note: if your hosting control panel has the option to 'Extract' files, you can use it to extract the files directly on your server after the .zip file is uploaded.
Uploading PrestaShop engine files
If you have extracted the files locally to your computer, you will need to upload them to your hosting server.
This can be done using the hosting control panel File Manager or third party FTP Manager applications like FileZilla, TotalCommander, CuteFTP, Winscp etc.
Theme Overview
Electrive - Prestashop Electronic Marketplace Theme for dedicated to electronics PrestaShop. It is a simple and clean layout with elegant design, very easy to install and to use. No HTML knowledge requries, easy to install and easy to use. Store Include Prestashop 1.7 Template with Electronics demo. For Faster checkout also contain One Page Checkout for the customer. The theme is responsive and supports all devices, user-friendly and fine-looking will be the best solution for your business.
File Structure
Electrive Theme include below files:
- Electrive.zip
- Assets
- Config
- Dependencies
- Modules
- Templates
- Translations
- PSD file
- Documentation file
Theme Installation
NOTE: Please read the whole section before attempting to install the theme. It is recommended to always backup your system before making any upgrades or changes!
Start Installation:
Follow this below step to install theme in prestashop.
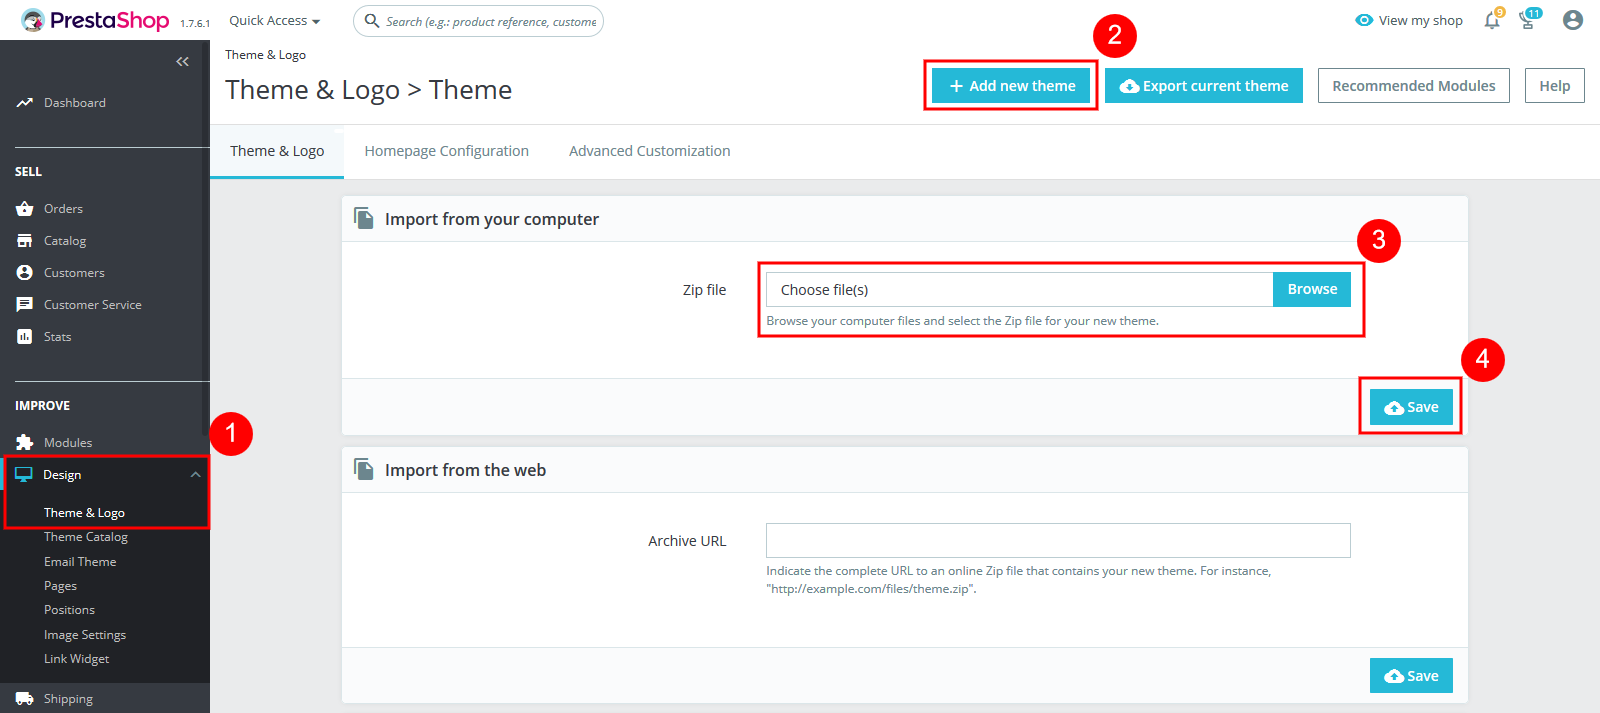
- Go to Design > Theme and Logo.
- Click on "Add new theme" button.
- The next window appear, now upload your Theme zip.
- Click on Save button.
After upload the theme zip, click on Use this theme button.
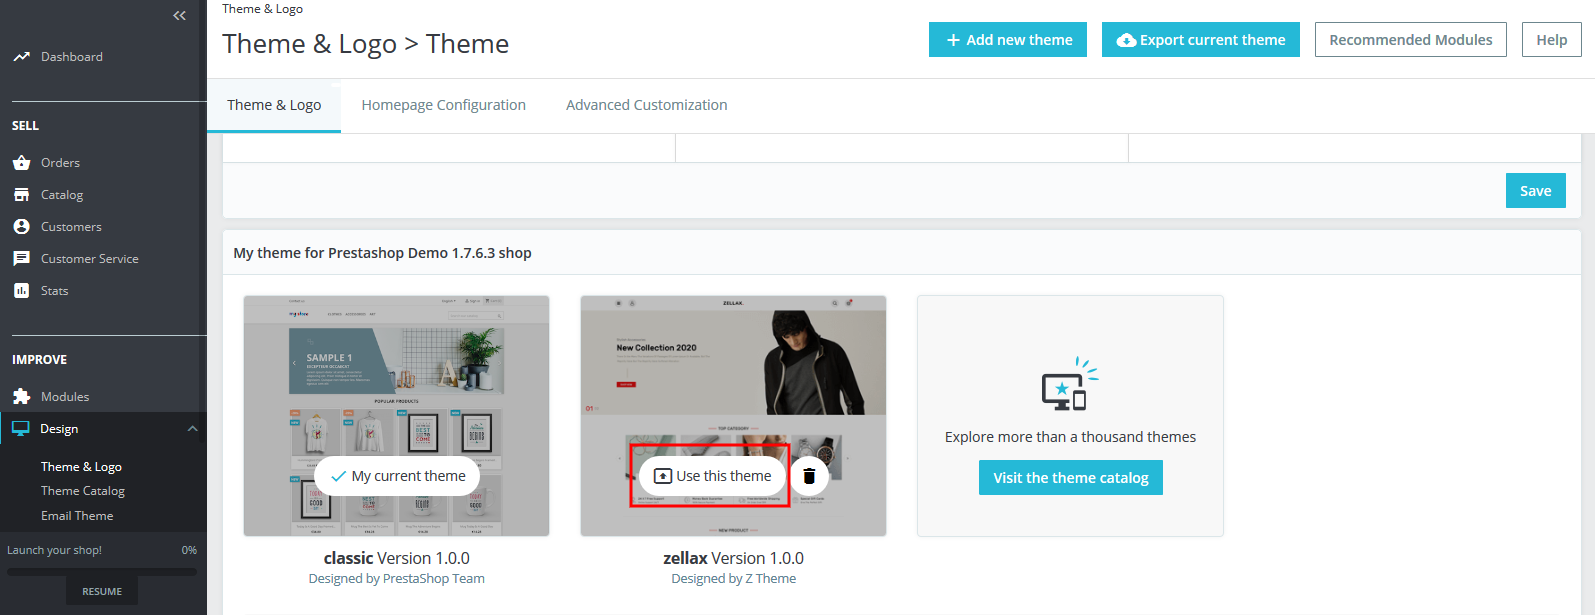
Now your theme is successfully install. Go to front side and check it.
Logo setting
To upload logo and favicon icon, Go to Design > Theme and Logo.
NOTE: Upload favicon icon with .ico extention. For Example "faviconname.ico"
Regenerate Thumbnails
To create or edit image size, Go to Design > Image Settings. Click on "Regenerate thumbnails" button.
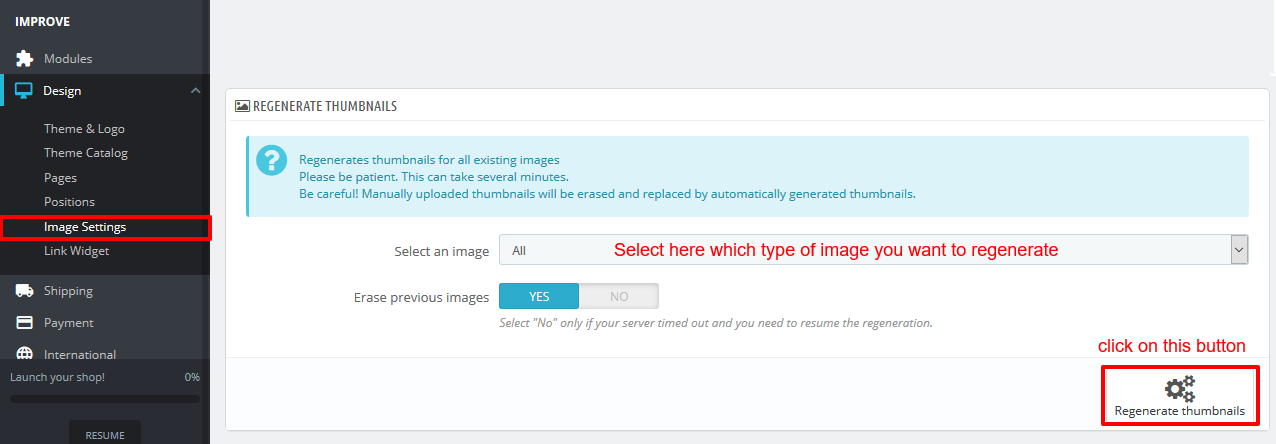
Select which type of image you want to regenerate, and click on "Regenerate thumbnails" button.
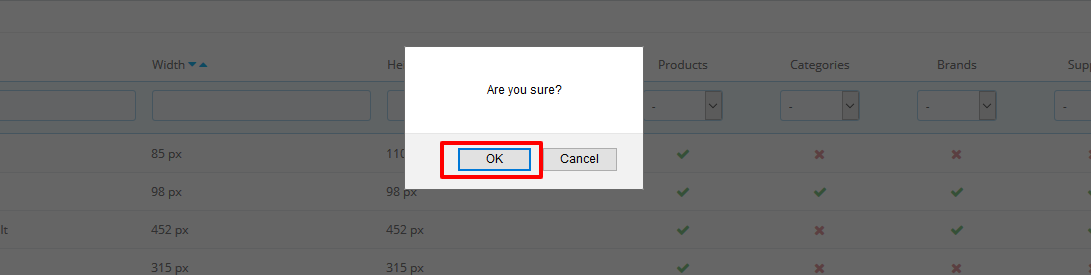
After regenerate image, you get this below message.

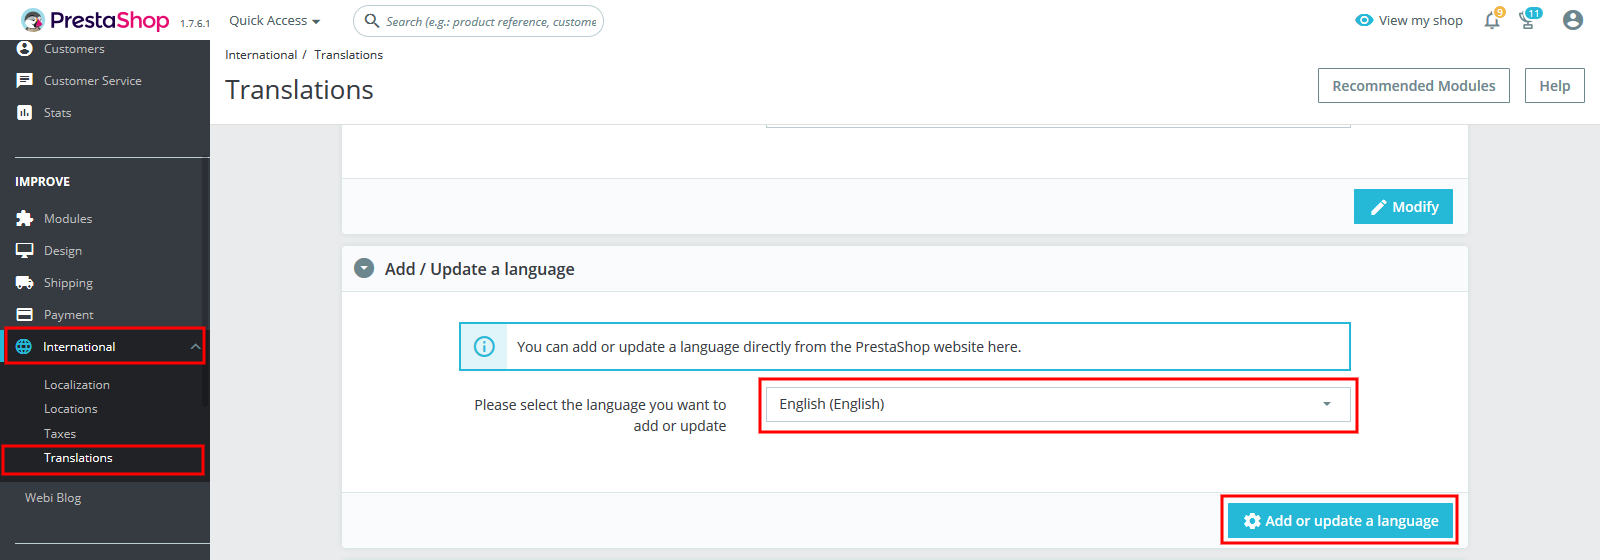
Add / Update a Language
To add or update language, Go to International > Translations.
Select the language you want to add or update and click on Add or update a language button.
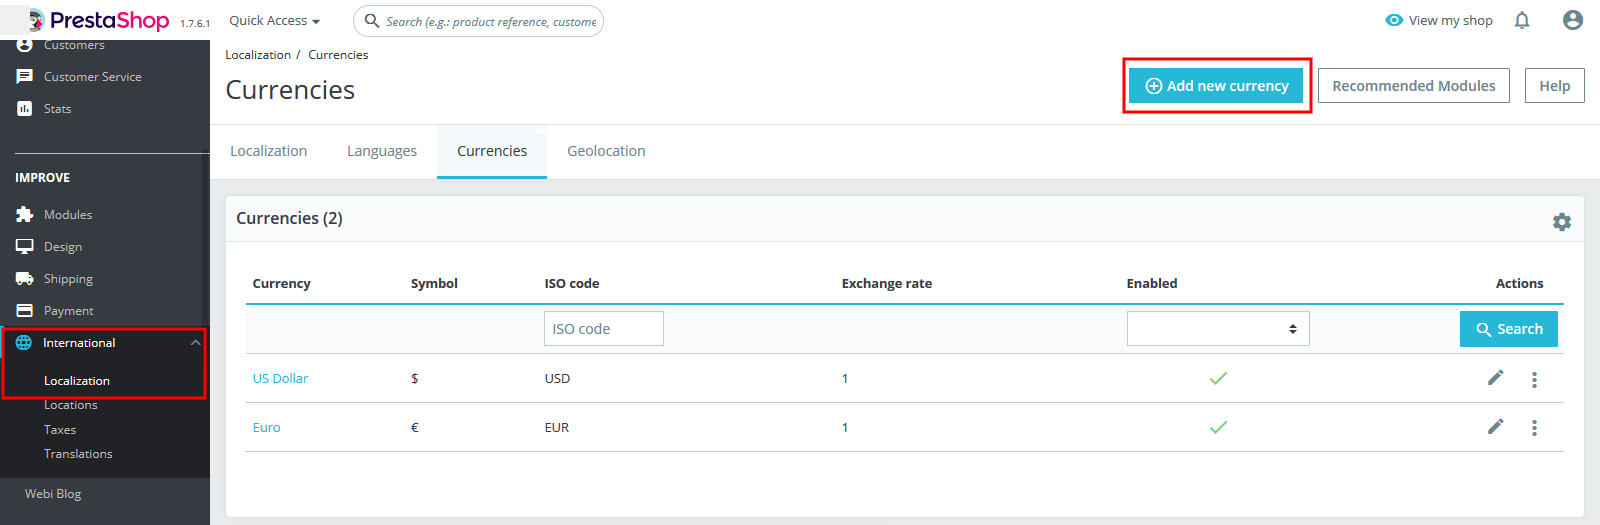
Currency Setting
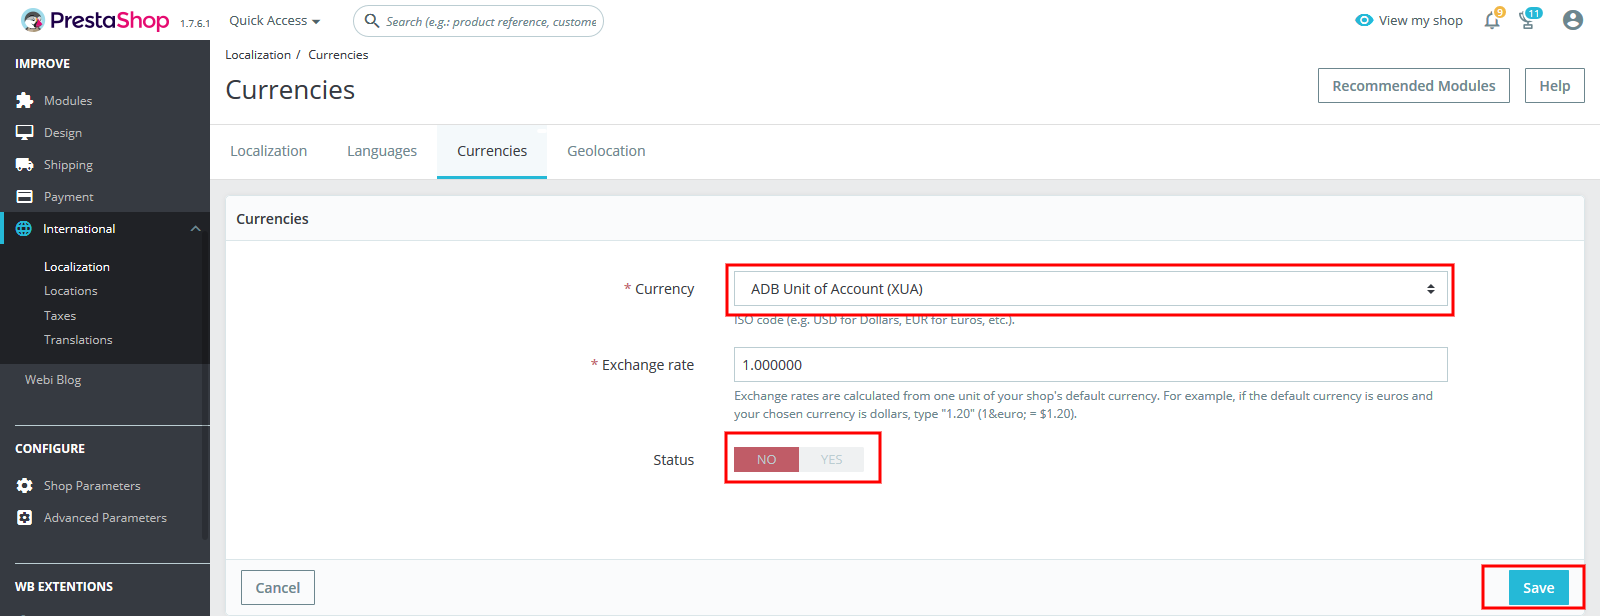
To add currency, Go to International > Localization > Currency tab. Click on "Add new currency" button.
The new window appear, select currency and enable status. Click on Save button.
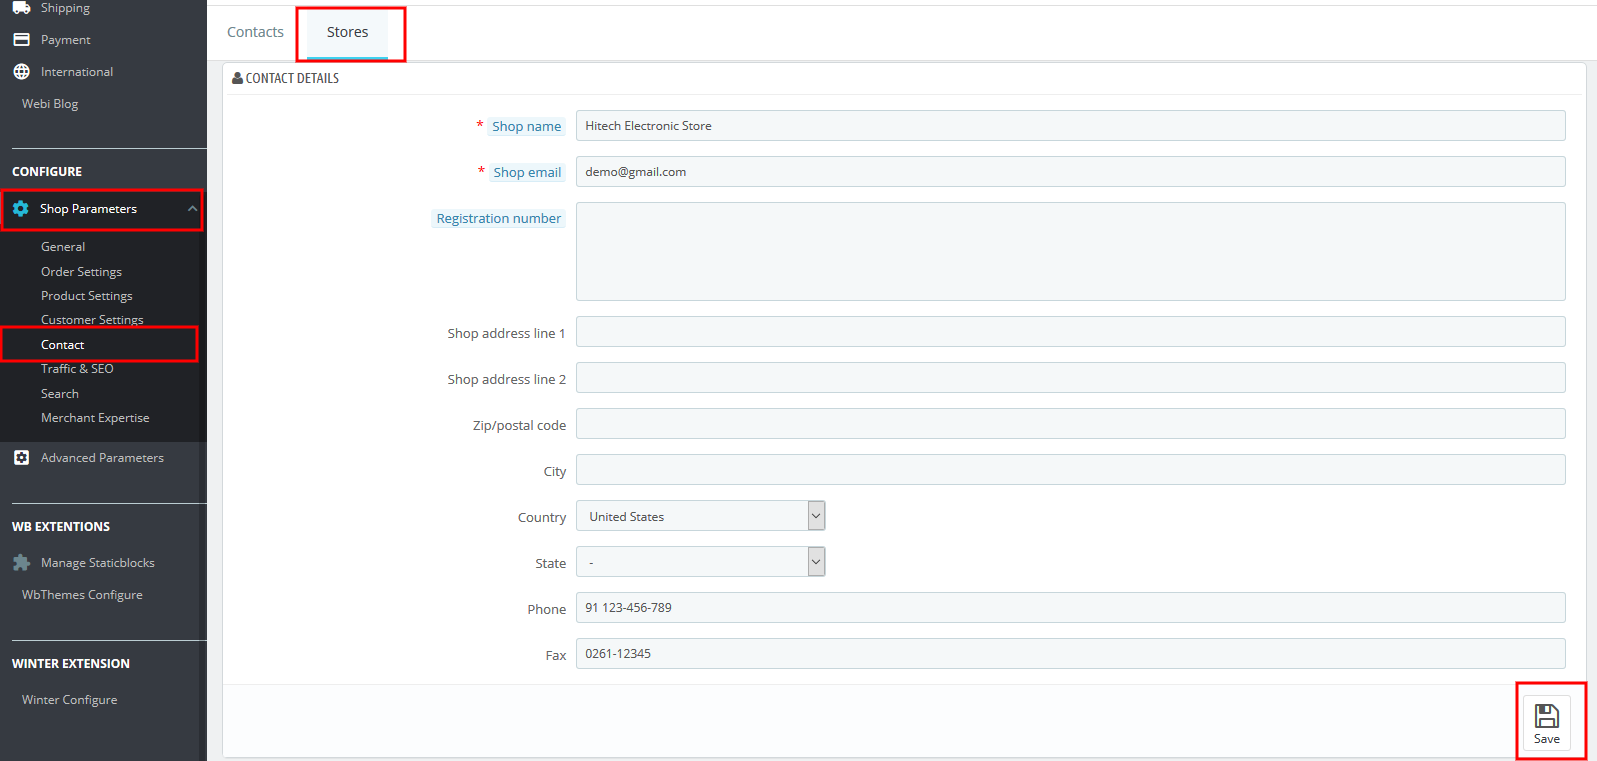
Store setting
To edit store information details, Go to Shop Parameters > Contact > Stores tab.
Add your contact details and "Save" it.
Modules Installation
After install a new theme, Go to Modules > Module Manager. You will find below module related to theme.
Webi Ajax Live Category Search
Webi Ajax Live Category Search module is ajax live search module. It will also display product image in search bar.

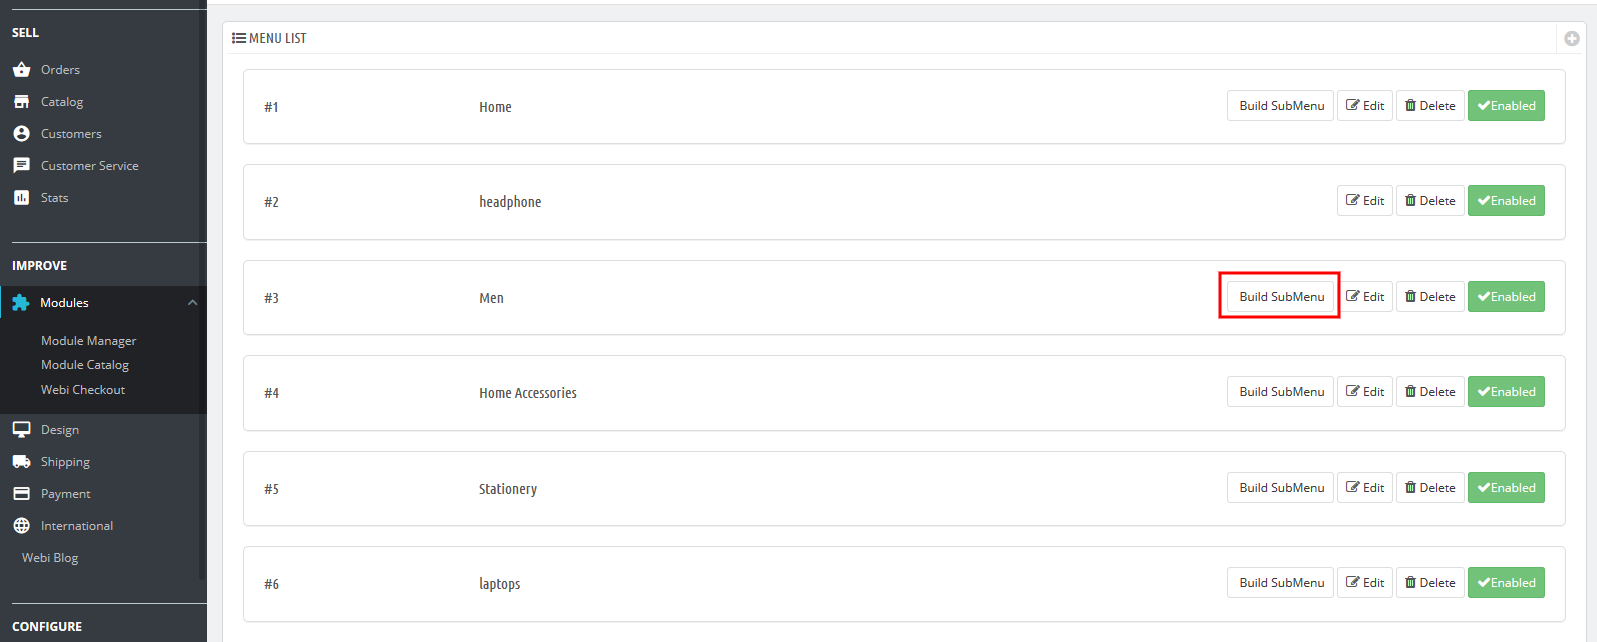
WB Megamenu
Go to Modules > Module Manager > WB Megamenu. Click on "Configure" button.

Click on "+" icon to add menu.

In below screenshot, you will see all details for menu.
Choose "prestashop link" to add menu automatically you just select category nothing else. Otherwise, choose "custom link" to add custom link by yourself. Fill below field as per your requiremenr and last, click on "Save" button.

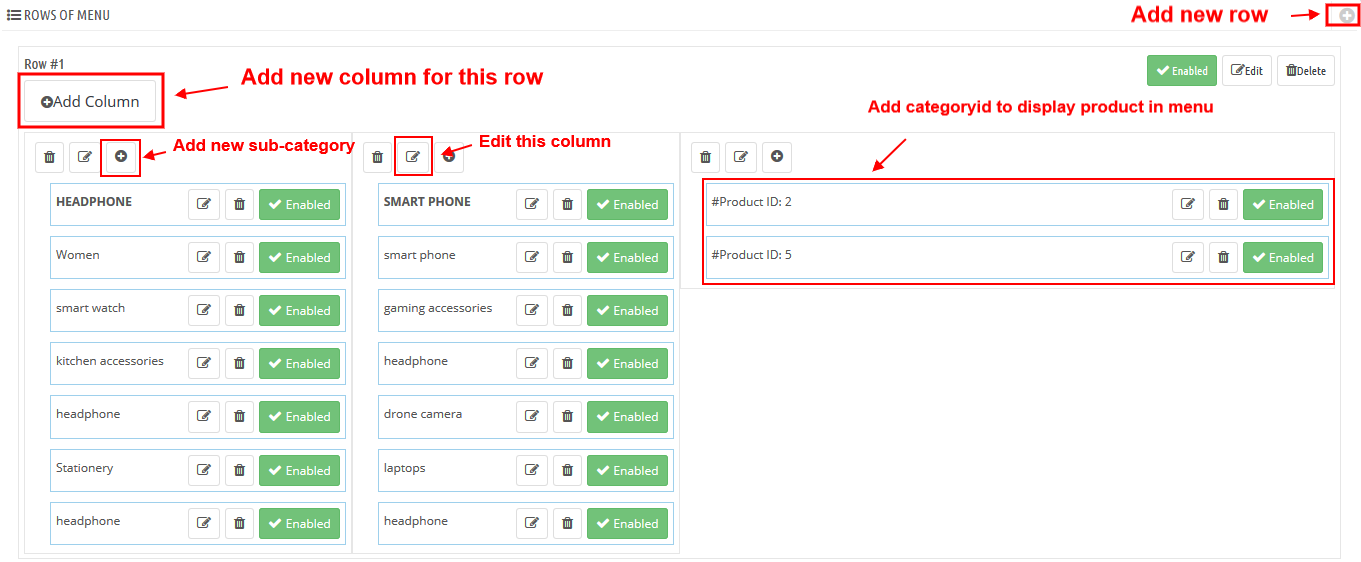
Now, click on Built SubMenu button to add subcategory, product image, banners etc.
For better understanding, you can also see video for mega menu. Click on How to add mega menu in PrestaShop.
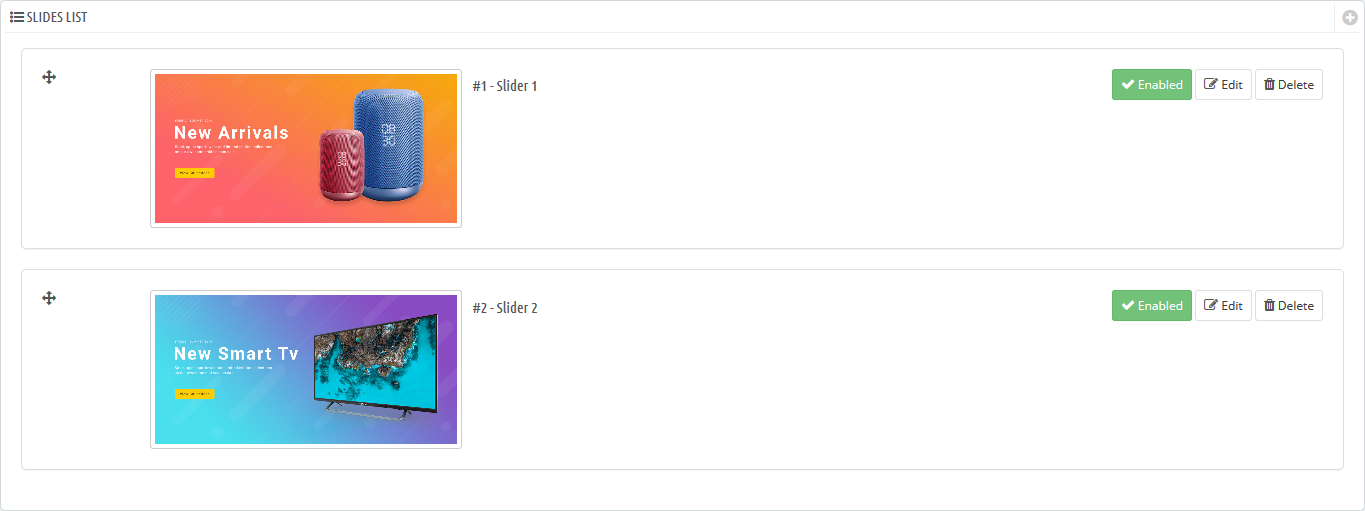
WB Custom Image slider
Go to Modules > Module Manager > WB Custom Image slider. Click on "Configure" button to add slider.

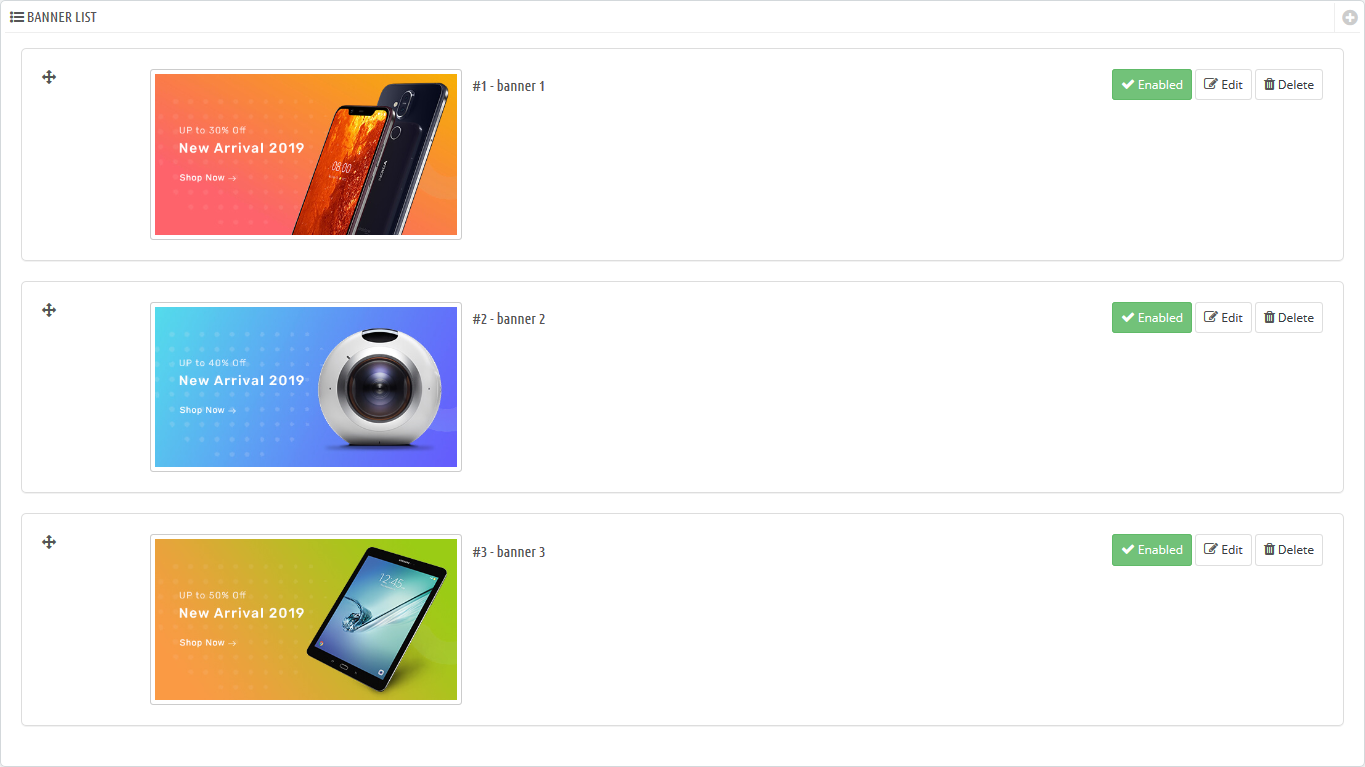
WB image banner
Go to Modules > Module Manager > WB image banner. Click on "Configure" button to add banner.

Specials block
Go to Modules > Module Manager > Specials block. Click on "Configure" button to manage product.


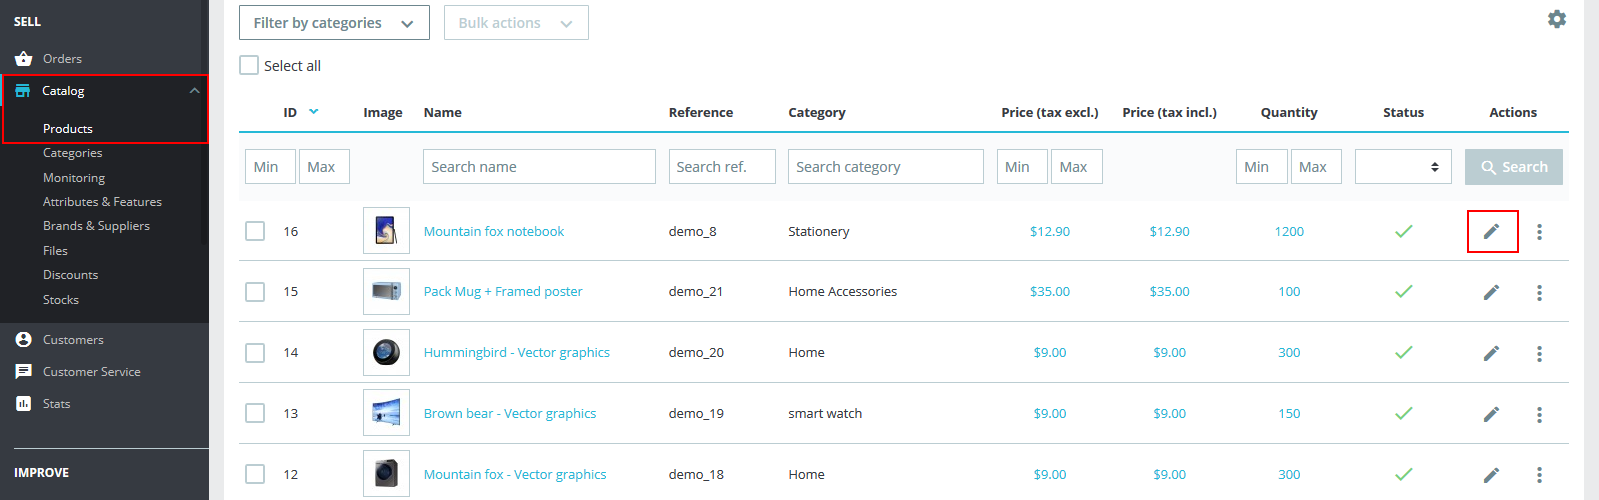
How to add product in special block:
Go to Catalog > Products > Edit Product.
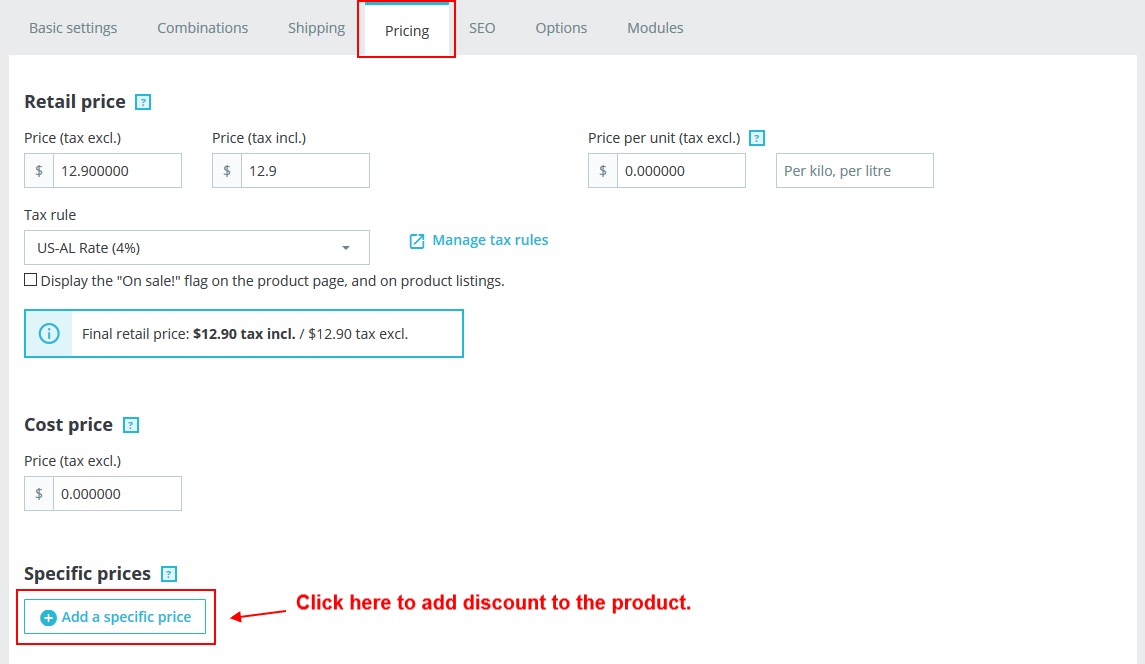
Product countdown
To add countdown timer to the product, you need to edit that product which you want to add timer.
Go to Catalog > Products > Edit Product.
Go to "Modules" tab. configure product countdown. Select "Yes" to display countdown timer and select start date and end date. Click on "Save" button.

Category Featured products
Go to Modules > Module Manager > Category Featured products. Click on "Configure" button to manage product.

Featured products
Go to Modules > Module Manager > Featured products. Click on "Configure" button to manage product.

WB Custom Image banner
Go to Modules > Module Manager > WB Custom Image banner. Click on "Configure" button to add banner.

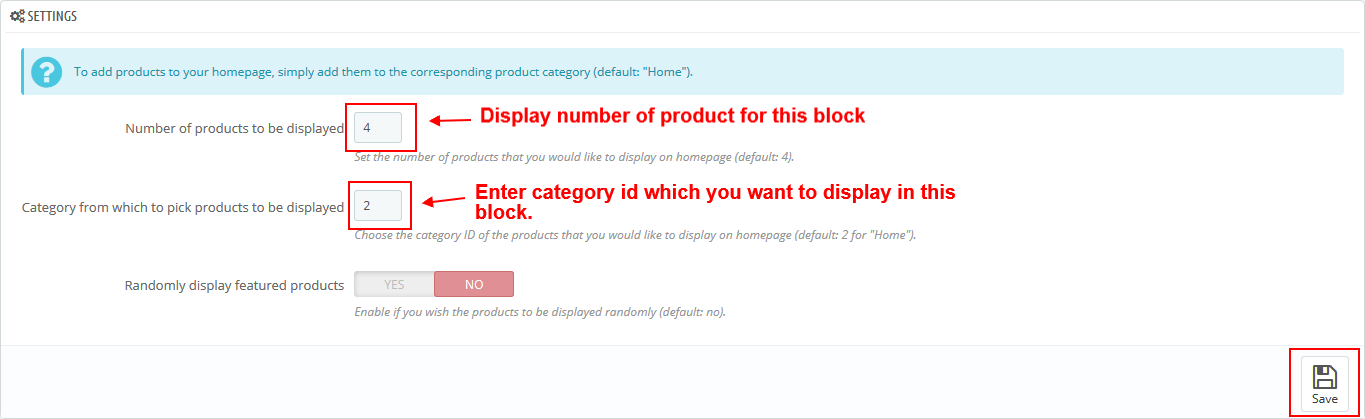
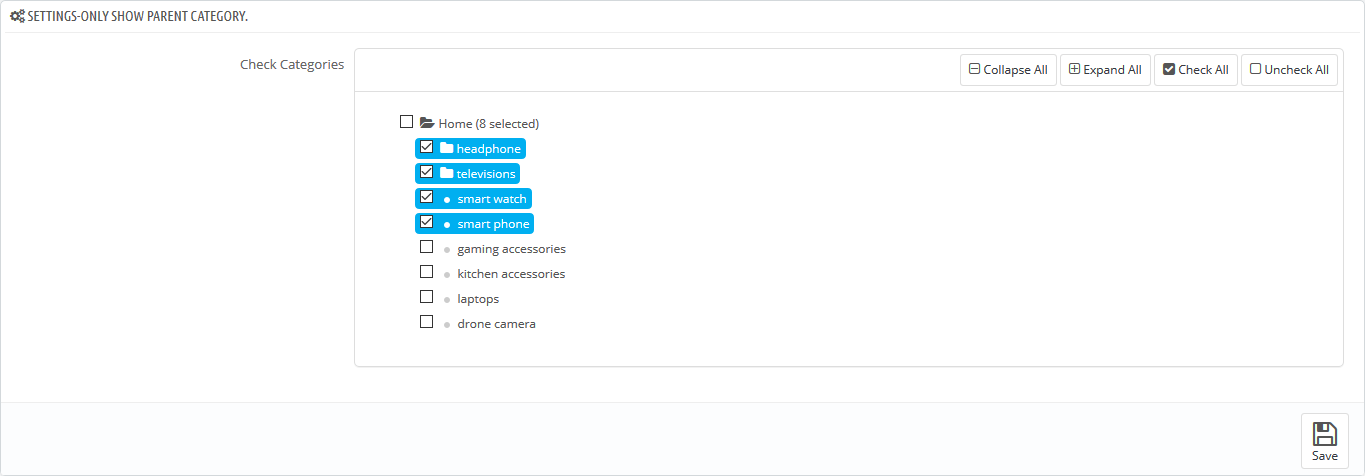
WB Category Feature
Go to Modules > Module Manager > WB Category Feature. Click on "Configure" button to manage category.

Select category which you want to display in home page.
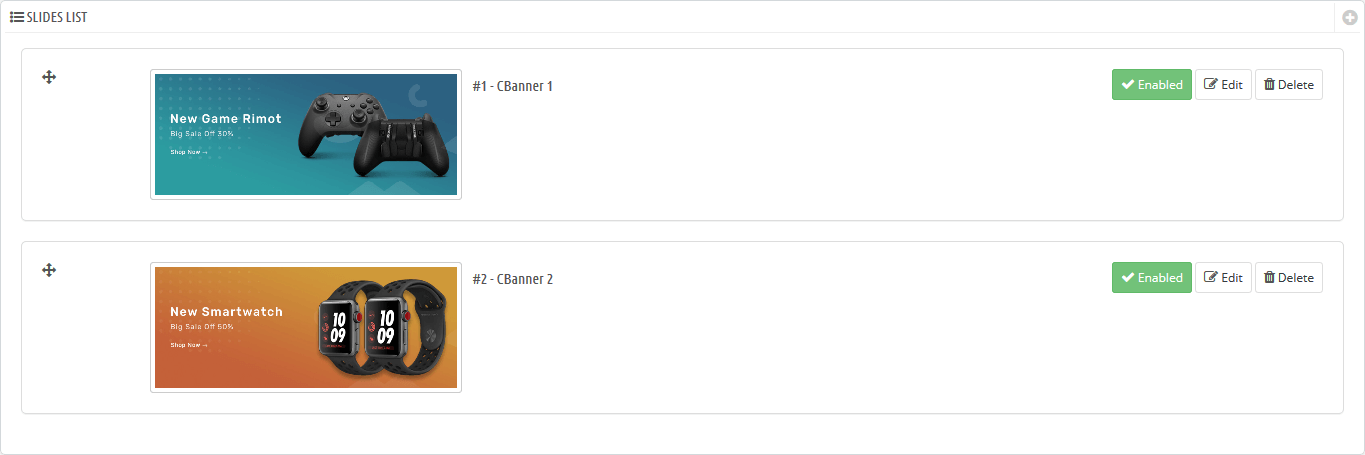
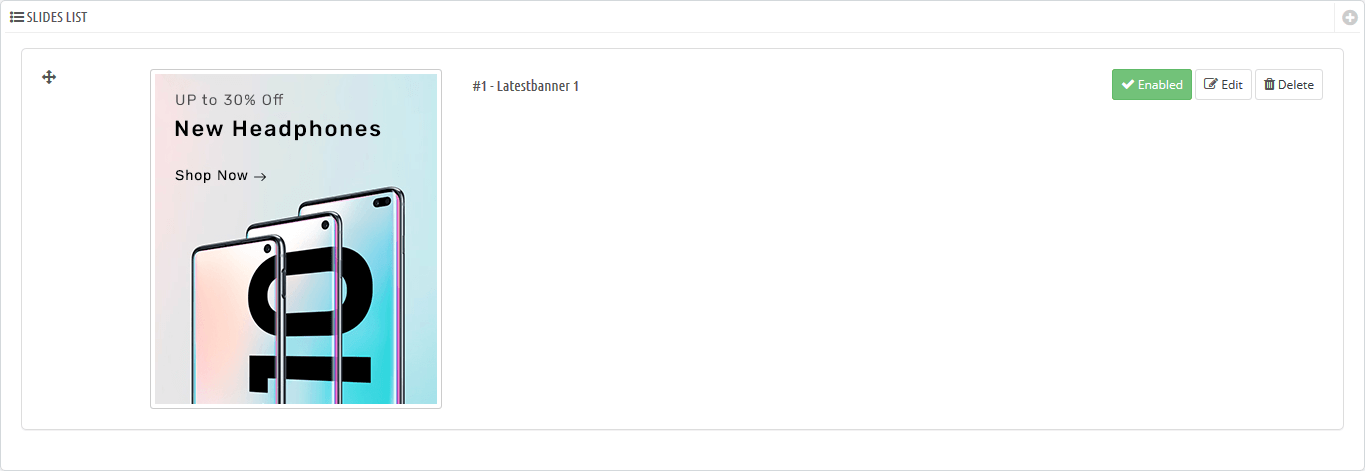
WB latest banner
Go to Modules > Module Manager > WB latest banner. Click on "Configure" button to add banner.

New products block
Go to Modules > Module Manager > New products block. Click on "Configure" button to manage product.


Top-sellers block
Go to Modules > Module Manager > Top-sellers block. Click on "Configure" button to manage product.


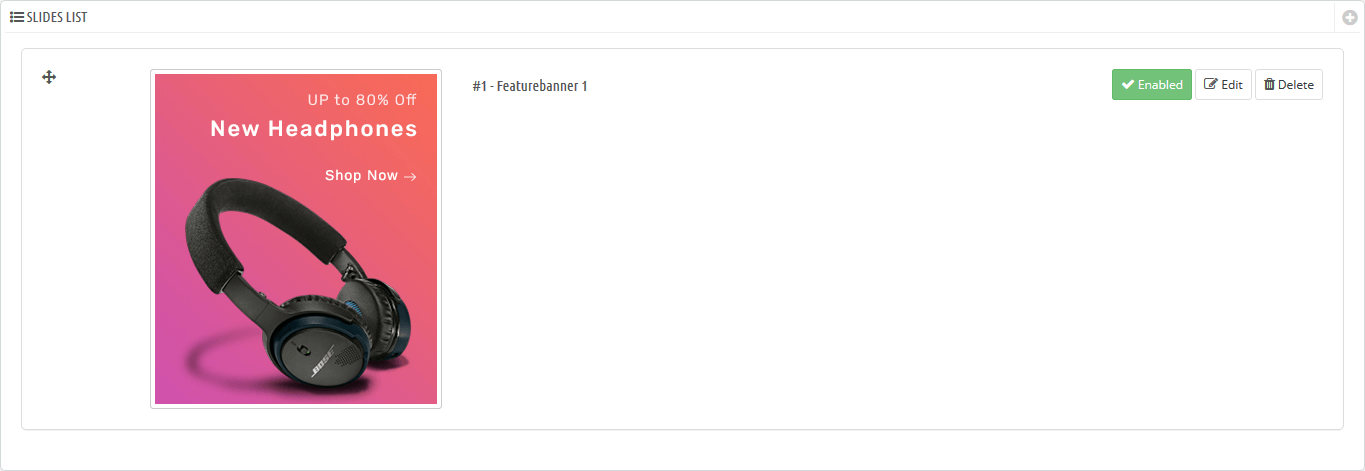
WB feature banner
Go to Modules > Module Manager > WB feature banner. Click on "Configure" button to add banner.

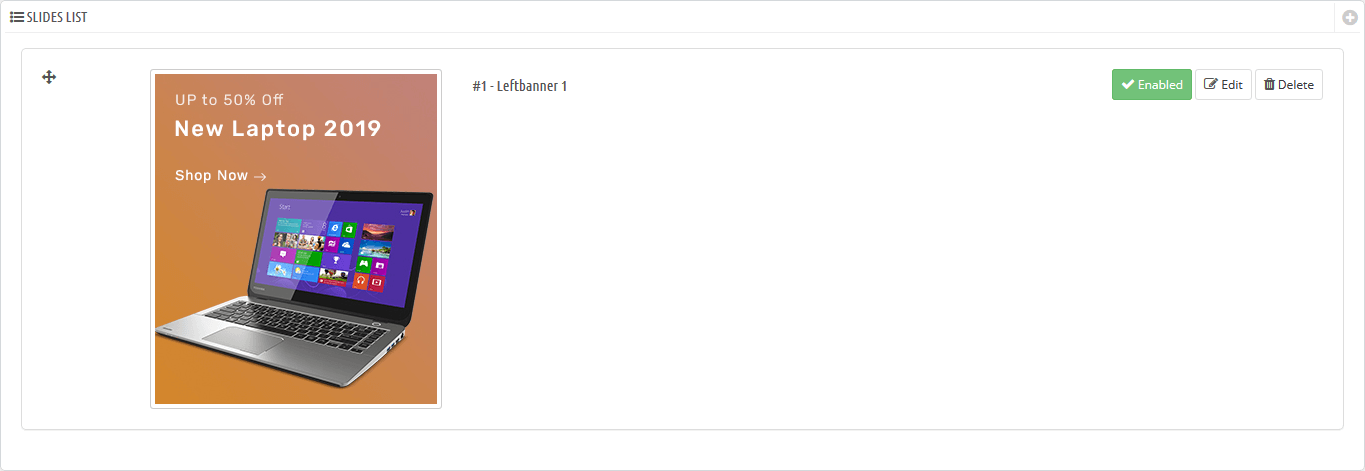
WB left banner
Go to Modules > Module Manager > WB left banner. Click on "Configure" button to add banner.

Left Featured products
Go to Modules > Module Manager > Left Featured products. Click on "Configure" button to manage product.

WB Offer banner
Go to Modules > Module Manager > WB Offer banner. Click on "Configure" button to add banner.


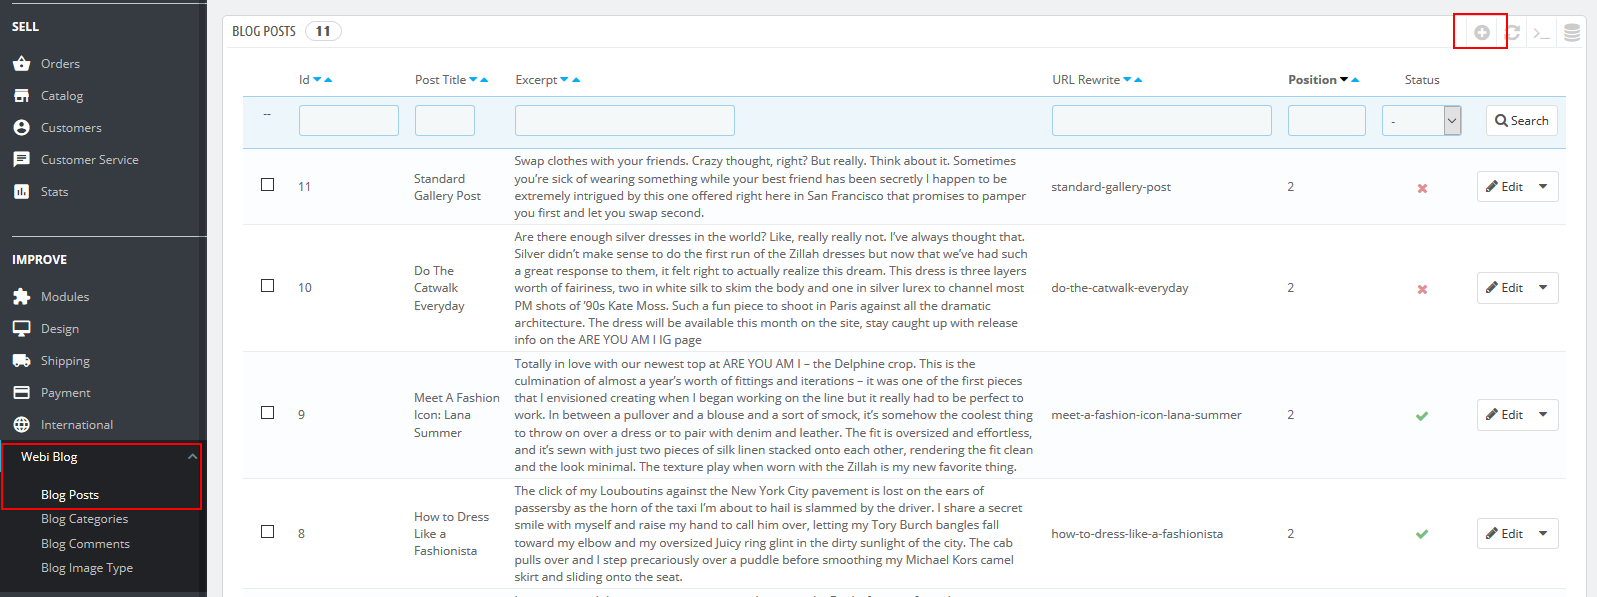
Webiarch Blog Module
Go to Modules > Module Manager > Webiarch Blog Module. Click on "Configure" button to manage blog.

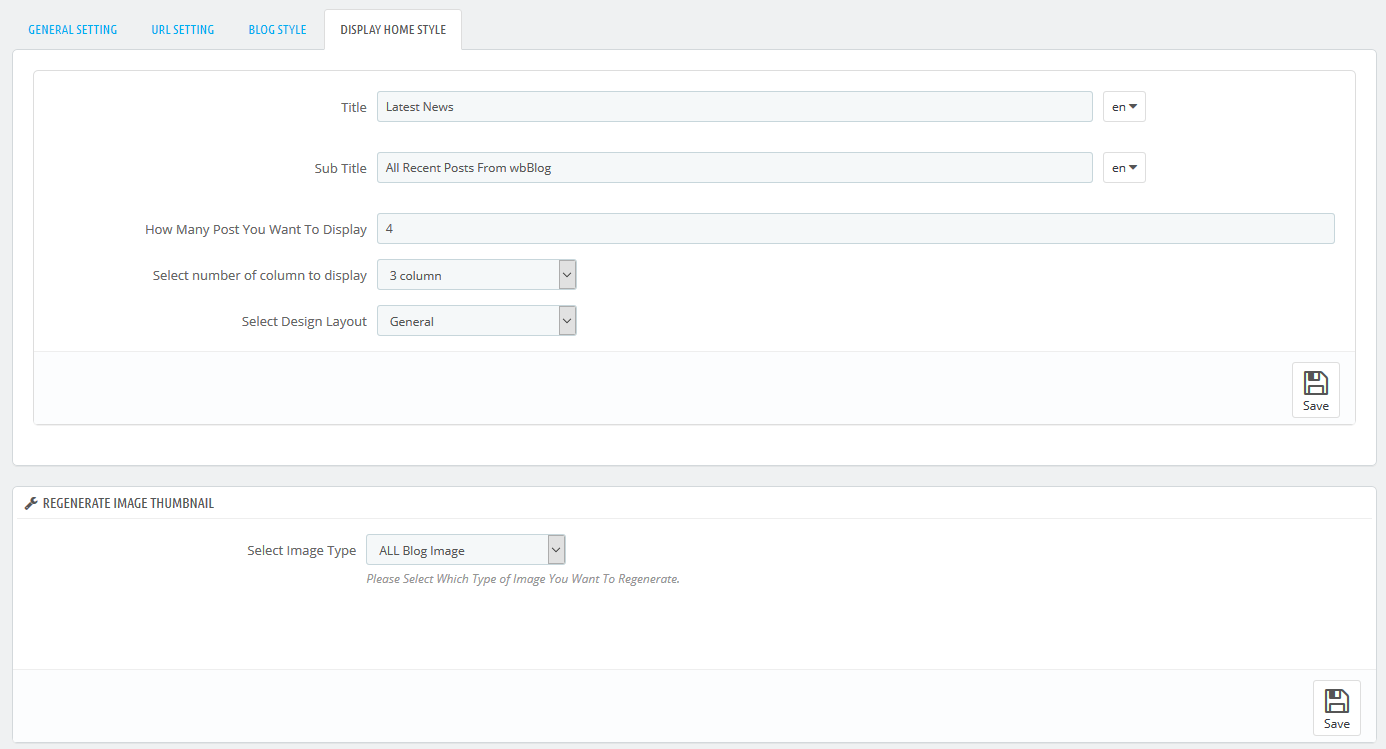
To create or add blog, Go to Webi Blog > Blog Posts.
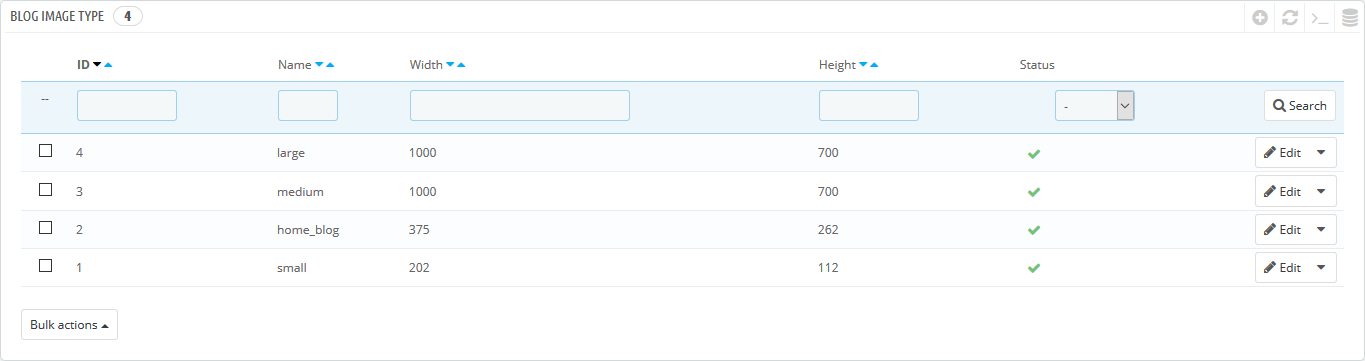
You can also change the blog image size. Go to Webi Blog > Blog Image Type.
After change the size, you have to regenerate image. For regenerate image Go to Modules > Module Manager > Webiarch Blog Module > Configure > Display Home Style tab > regenerate image.
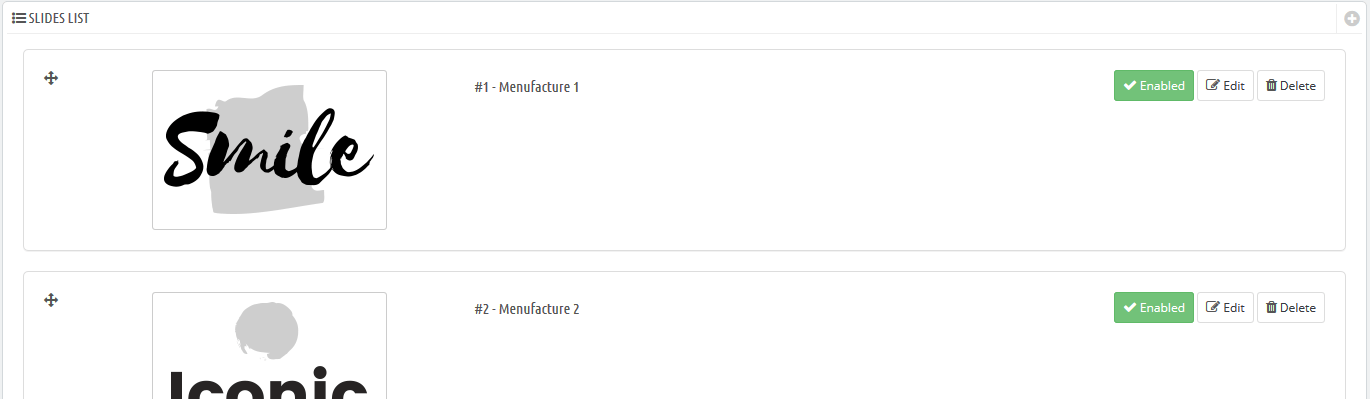
WB Logo slider
Go to Modules > Module Manager > WB Logo slider. Click on "Configure" button to add logo slider.

Wb Staticblock
To add any static content in theme, Go to Wb Extentions > Manage Staticblocks. You can see all static content available related to theme you can change them here.
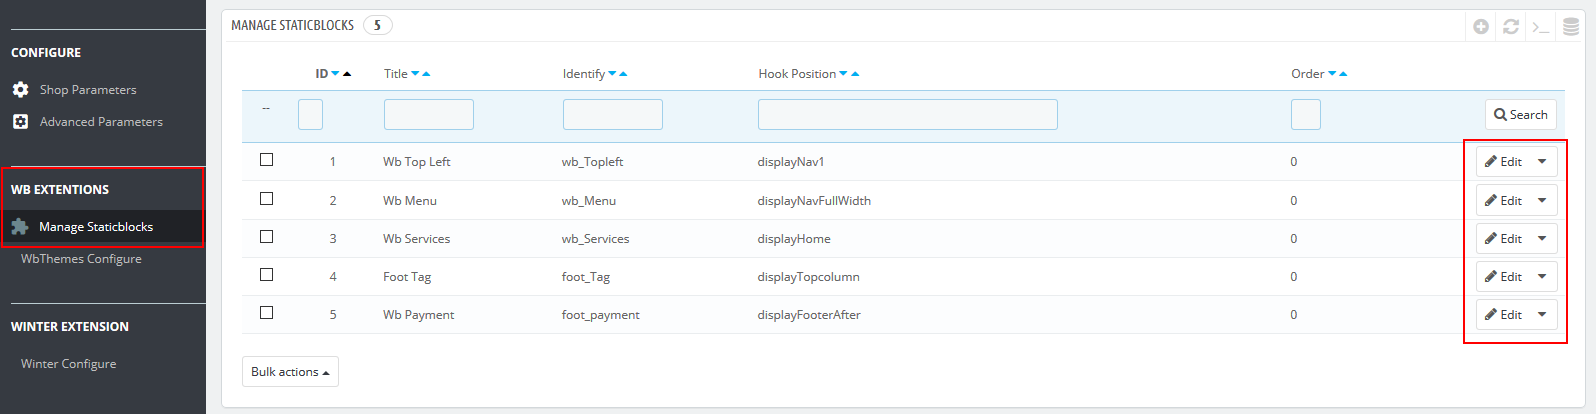
Wb Top Left
<ul>
    <li><span>Get 30% Off On Selected Items</span></li>
</ul>

Wb Menu
<div class="rightmenu col-xs-12 col-sm-8 col-md-8 col-lg-8 col-xl-8 text-xs-left hidden-md-down">
<ul class="statmenu hidden-sm-down">
<li><a href="contact-us">contact us</a></li>
<li><a href="new-products">latest</a></li>
<li><a href="sitemap">sitemap</a></li>
<li><a href="prices-drop">special</a></li>
<li><a href="best-sales">bestseller</a></li>
</ul>
</div>

Wb Services
<div class="container">
<div class="h-ser">
<div class="row ser-mbt deliveryinfo">
<div class="col-lg-3 col-md-3 col-sm-3 col-xs-12 ses">
<ul>
<li class="ser-svg"><svg width="41px" height="40px"><use xlink:href="#suprt"></use></svg></li>
<li class="ser-t">
<h4>24/7 free support</h4>
<p>Passage of Lorem Ipsum</p>
</li>
</ul>
</div>
<div class="col-lg-3 col-md-3 col-sm-3 col-xs-12 ses">
<ul>
<li class="ser-svg"><svg width="41px" height="40px"><use xlink:href="#safe"></use></svg></li>
<li class="ser-t">
<h4>secure payment</h4>
<p>Passage of Lorem Ipsum</p>
</li>
</ul>
</div>
<div class="col-lg-3 col-md-3 col-sm-3 col-xs-12  ses">
<ul>
<li class="ser-svg"><svg width="50px" height="40px"><use xlink:href="#gift"></use></svg></li>
<li class="ser-t">
<h4>special gift cards</h4>
<p>Passage of Lorem Ipsum</p>
</li>
</ul>
</div>
<div class="col-lg-3 col-md-3 col-sm-3 col-xs-12 ser-s ses">
<ul>
<li class="ser-svg"><svg width="41px" height="40px"><use xlink:href="#cust"></use></svg></li>
<li class="ser-t">
<h4>world wide shipping</h4>
<p>Passage of Lorem Ipsum</p>
</li>
</ul>
</div>
</div>
</div>
</div>

Wb Tag
<div class="row fbtm">
<div class="foot-tag col-sm-8 col-xs-12">
<div class="fbottom">
<h3 class="d-inline-block float-xs-left">fashion-</h3>
<ul class="header-link">
<li><a href="#">sofa</a></li>
<li><a href="#">chair</a></li>
<li><a href="#">dining table</a></li>
<li><a href="#">desk</a></li>
<li><a href="#">table</a></li>
<li><a href="#">livingroom</a></li>
<li><a href="#">bathroom</a></li>
<li><a href="#">badroom</a></li>
</ul>
</div>
<div class="fbottom">
<h3 class="d-inline-block float-xs-left">furniture-</h3>
<ul class="header-link">
<li><a href="#">stool</a></li>
<li><a href="#">table lamp</a></li>
<li><a href="#">night stand</a></li>
<li><a href="#">pillow</a></li>
<li><a href="#">bar table</a></li>
<li><a href="#">tv</a></li>
<li><a href="#">radio</a></li>
<li><a href="#">clock</a></li>
<li><a href="#">computer desk</a></li>
</ul>
</div>
<div class="fbottom">
<h3 class="d-inline-block float-xs-left">electronic-</h3>
<ul class="header-link">
<li><a href="#">chair </a></li>
<li><a href="#">stool</a></li>
<li><a href="#">bed</a></li>
<li><a href="#">stool</a></li>
<li><a href="#">table lamp</a></li>
<li><a href="#">night stand</a></li>
<li><a href="#">pillow</a></li>
<li><a href="#">bar table</a></li>
<li><a href="#">stool</a></li>
<li><a href="#">table lamp</a></li>
</ul>
</div>
</div>
<div class="col-sm-4 col-xs-12 text-xs-center">
<div>
<h5 class="c-info">download this app</h5>
<ul class="list-inline list-unstyled foot-app d-inline-block">
<li>
<div class="fb1"></div>
</li>
<li>
<div class="fb2"></div>
</li>
</ul>
</div>
</div>
</div>

Wb Payment
<ul class="list-inline list-unstyled foot-payment">
<li><a href="#"><i class="fa fa-cc-mastercard"></i></a></li>
<li><a href="#"><i class="fa fa-cc-visa"></i></a></li>
<li><a href="#"><i class="fa fa-credit-card"></i></a></li>
<li><a href="#"><i class="fa fa-cc-paypal"></i></a></li>
</ul>
Well done!
Now Enjoy Beautiful creation
Thank you for purchasing our theme. if you have any issue feel free and contact us.
Social media follow links
Go to Modules > Module Manager > Social media follow links. Click on "Configure" button to add social icon.